Although an inexpensive, replicated part may look the same as an original part and may fit into the valve being repaired, it does not meet the original valve manufacturer’s design specifications. Therefore, it can cause leaks and prevent a valve from controlling properly, and often does not last as long as the OEM alternative would. It can also fail completely, preventing the valve from operating, and causing an entire process to be shut down at a cost of hundreds of thousands of dollars per day.
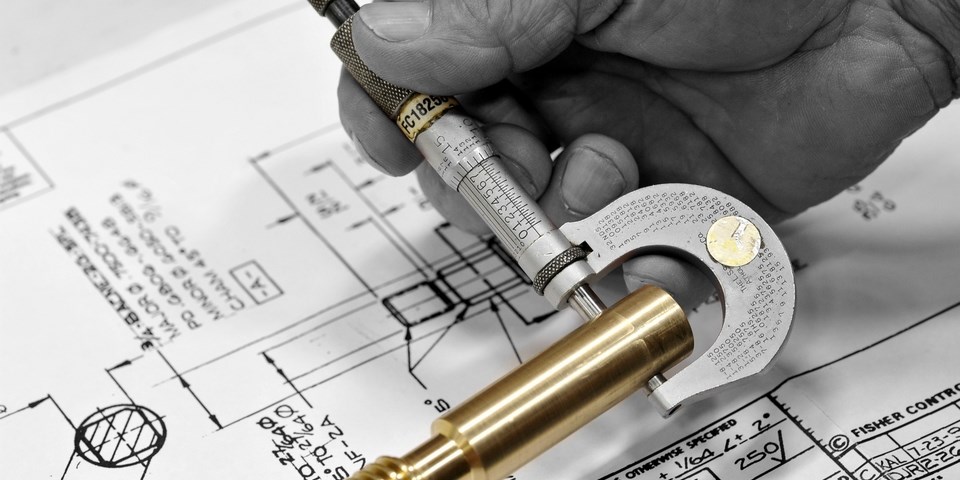
To duplicate a part, a non-OEM machine shop must first measure it to estimate all the proper dimensions. This can be accomplished with a coordinate measuring machine (CMM), profilometer, and handheld gauges such as calipers (Figure 1), micrometers, gage blocks and plug gages. In most cases, the non-OEM machine shop may measure only one part. That part may be used, worn or damaged, especially if it was removed from a valve under repair. The worn part is likely to be significantly out of spec. But even if the measurements are accurate and correctly identify the part’s dimensions, this does not represent the part’s complete design specifications.
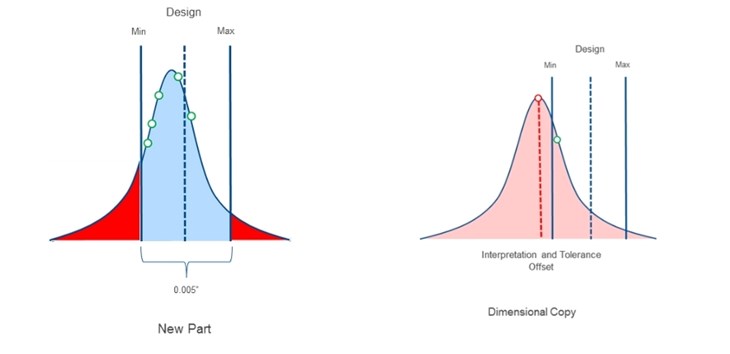
Dimensional tolerances typically follow a normal statistical distribution (Figure 1), so a new part fits into the blue area of the chart, within 0.005 in. of the design spec, for example. The part being measured, therefore, could be to the left or right of the design spec. If a machinist measures only one part, especially if it’s worn, it could be out of tolerance (outside the blue area).
If the measured part falls into the left-hand portion of the design spec—even if it’s within tolerance— when it is actually machined it could fall out of tolerance (see Figure 2). This is because of the inherent variability in machine tools, and machining tolerances. The design tolerances of OEM valve parts are extremely tight, so even slight inaccuracies can affect the quality of a part.
When a part is machined by the original valve manufacturer, quality control checks comparing measurements to design specs will detect a part out of tolerance. A non- OEM replicator, who does not have the design drawings, can only check that the machined part closely matches the one measured. Even if they measure a brand-new part, they can still produce a substandard replicate part.
When a non-OEM produces a substandard part, it might just adversely affect a single valve produced for one customer. But if the non-OEM continues to use the same measurements to supply similar parts to multiple customers, it could be distributing substandard parts widely.
Emerson is often called upon to evaluate failed parts from non-OEM suppliers. After evaluating dozens of substandard parts, our engineers made a statistical analysis on the re-engineering process of measuring a machined part’s dimensions. The analysis determined that when a machinist tries to measure an OEM part to duplicate it, it’s almost impossible to replicate each dimension of the OEM part, since the machinist has no idea which side of the tolerance that specific part’s dimension was machined to originally. Standard statistical principles state 30+ samples from any given population are needed to produce a statistically accurate result.
In this instance, the engineering team calculated that it would take measurements from 35 unique and new OEM parts of the same part number to determine the actual manufacturing tolerances. But this still doesn’t yield the design specifications. Also, it’s highly unlikely that the non-OEM replicator would purchase 35 OEM parts just to sell one part, let alone duplicate that investment for literally thousands of valve parts.
The tolerance stack
Another failure analysis involves what is called the tolerance stack. This impacts many control valve designs using multiple parts to properly seal pressure-containing joints or other key interfaces. Tolerance stack is often used to help answer the question, “How important is a single parts dimension and tolerance when it’s off by 1 or 2 thousandths of an inch?” Control valve designs use a reference dimension in the assembly, a key dimension that all other parts dimensions and tolerances are designed to and then tested against within that valve assembly. Having the correct sealing compression on a gasket or Oring— through temperature cycles and normal operation, trim friction and wear—is key to safety, long service life and performance. If a non-OEM happens to get a part machined close to but outside the design drawing dimension, the part will be almost always be tested in service by their customer, often with a premature failure caused by that single component.
Non-OEM replicators may get close on one or two parts tolerances by measuring single parts and making their own drawings, and may even get lucky and hit a few measurements on the nose. But, they have no idea how a shift in the combined part dimensions will impact safety and valve performance when all the parts are put together in a valve assembly. And of course, they do not test the valves after their parts are installed to find out if it’s up to spec because this would be impossible without the original reference dimension, as well as a testing lab.

A PMI gun can identify only two of the material treatments and processes defined in ASTM A494 and used by
Material measurements
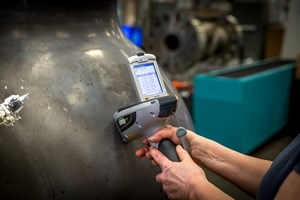
By using a positive material identification (PMI) gun, non-OEMs can scan a part to identify the composition of the alloy. A PMI gun is an X-ray fluorescence analyzer used to analyze, identify and display chemical composition and grade. Unfortunately, that’s all it can do.
In the example above the ASTM A494 specification for chemistry control and heattreating temperature control (Figure 2), but it can’t measure or identify any of the other processes and treatments involved when producing materials for valve parts, such as liquid penetrant (LP) examination and post weld heat treatment (PWHT).
Several other difficult to measure processes go into making valve parts, including surface finish of a valve stem, ion nitriding of a valve cage, honing, the use of vacuum furnaces to reduce oxidation, and heat treating. Unless the non-OEM replicator has access to OEM design documentation, the machinists have no idea of the processes the valve manufacturer used to make a part.
Most plants have dozens if not hundreds of control valves. Each of these valves requires ongoing maintenance because there are many moving parts, and many plants are tempted to use non-OEM parts replicators, thinking they are saving money. While non-OEM parts may work in some cases, the parts are not equivalent to parts from the original valve manufacturer. Using substandard parts can cause the problems listed in the Table along with other issues, and the anticipated savings can quickly turn into higher costs and decreased safety.
Here are some of the leading issues caused by dimensional and material problems in replicated non-OEM valve parts:
1. Poor control around setpoint
2. Reduced service life
3. Galling of metal
4. Leaks
5. Valve Failure
1. Poor control around setpoint:
Friction is the enemy of good control. Every valve manufacturer designs parts to minimize friction. A plug and cage are the best examples of where a dimensional issue can massively increase friction. Increased friction makes a valve harder to operate and can result in a valve actuator no longer able to position the valve to the set point sent by the control system. This type of issue would be quickly noticed by a customer when it is so excessive as to cause the valve to not operate. But most users will not notice a set point deviation in the range of 5 % without specifically looking for it. This is particularly true if there is no mechanism in place to measure valve position.
A new valve, or one rebuilt to new specifications, will typically be able to hit setpoint within 1/8%. The difference between 5% and 1/8% can in many cases be directly tied to operational waste; i.e., using more energy to operate the process, or generating product off spec. This impacts the bottom line, but can go unnoticed because it is very difficult to trace the problem back to the offending control valve. Plant personnel spend often spend many hours trying to tune a flow control loop to maintain setpoint before they realize the problem rests with a control valve not performing to specification.
2. Reduced service life:
Higher friction can quickly lead to increased wear and lower service life. It’s common for a valve manufacturer to harden mating or trim parts to increase their service life. The hardening processes by which this is done are very important. In the case of a hard overlay—typically a welding process—the thickness and application are critical to service life. If the overlay is too thick or too thin when applied, the overlay will be ineffective, and the parts will wear out prematurely. Valve manufacturers have the equipment and engineering capabilities to perform hardening correctly, but non-OEM replicators may not, and usually don’t have access to the specifications for overlays and other critical processes for reducing friction.
3. Galling of metal:
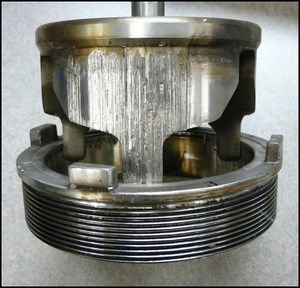
Galling is a very common problem that needs to be addressed in the original valve design, as there are always mating parts (see image). If a valve is installed in a process that requires hardened trim but the replicator doesn’t harden the parts, the parts can gall the surface and quickly fail. The PMI gun cannot detect how a part was hardened by the valve manufacturer and the non-OEM doesn’t have the hardening spec, so the hardening technique would likely go unidentified, and a premature failure could result.
4. Leaks:
Leaks through the packing or flanges due to substandard parts can cause operational waste, process control, safety, OSHA or EPA issues. One critical manufacturing process that can’t be easily measured or duplicated by a replicator is stem finish, which relates to packing life and leakage. Emerson engineers measured the surface finish on a non-OEM valve stem that failed: the replicated part measured 11 times rougher than the Fisher valve part.
5. Valve failure:
A complete failure is rare but can happen when a replicator does not have the product expertise to understand design limitations. This can lead to a dangerous plant situation, causing a plant to shut down, or causing a more serious incident. Most safety systems will catch a critical control valve failure, but they are designed to bring a plant to a safe shutdown and that means lost production time.
