Q: Our process engineer has asked me to specify a control valve for a new system he is designing. He has given me some process data, including the specific gravity of the process medium, its vapor pressure at the flowing temperature, and the maximum and minimum required flow rates. When I asked him what the pressure drop across the valve would be at the specified flow rates, he said I should select a valve that would create minimum pressure drop and suggested I consider a full port ball valve.
A: Perhaps the most misunderstood area of control valve sizing is the selection of the pressure drop, ΔP, to use in the sizing calculation. The pressure drop cannot be arbitrarily specified without regard for the actual system into which the valve will be installed. What must be kept in mind is that all of the components of the system except for the control valve (pipes, fittings, isolation valves, heat exchangers, etc.) are fixed, and at the flow rate required by the system (to cool a hot chemical to a specified temperature, maintain a specified level in a tank, etc.) the pressure loss in each of these fixed elements is also fixed. Only the control valve is variable, and it is connected to an automatic control system.
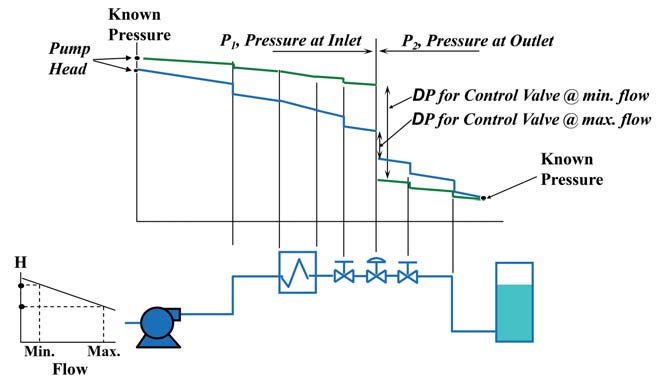
The control system will adjust the control valve to whatever position is necessary to establish the required flow (and thus achieve the specified temperature, tank level or whatever). At this point, the portion of the overall system pressure differential (the difference between the pressure at the beginning of the system and at the end of the system) that is not being consumed by the fixed elements must appear across the control valve. The correct procedure for determining the pressure drop across a control valve at the flow rate for which you plan to perform a sizing calculation, is to start upstream of the valve at a point where the pressure is known (for example a pump where the pressure can be determined from the head curve) and subtract the pressure loss in each of the fixed elements. When you get to the valve inlet, you know P₁, the pressure immediately upstream of the valve.
The next step is to go to a point downstream of the control valve where the pressure is known (for example, a tank where the head is known) and then work upstream toward the control valve, adding the pressure loss of each of the fixed elements. (You are adding the pressure losses because you are working in the direction opposite to the flow). When you get to the valve outlet, you know P₂, the pressure immediately downstream of the valve. The actual pressure drop across the control valve is the difference between the upstream and the downstream pressures, that is ΔP = P₁ – P₂.
If you plan to perform sizing calculations at more than one flow rate (for example, at both maximum and minimum design flows), you must repeat the calculation of P1 and P2 at each flow rate, since the system pressure losses (and pump head) are dependent on flow. This procedure is depicted in Figure 1. If the process engineer is unhappy with the sizing pressure drops you have used in your sizing calculations, he needs to reconsider his choice of pump or pipe size.


About the author
Jon F. Monsen, PhD, PE, is a control valve technology specialist with more than 45 years of experience in the control valve industry. He has lectured nationally and internationally on the subjects of control valve application and sizing. Jon currently hosts a website, www.Control-Valve-Application- Tools.com where he freely shares articles, training and professional development materials, and Excel worksheets that might be of interest to those who use or specify control valves. He can be reached at cvapptools@gmail.com.


